Wednesday, February 8, 2012

Auto Start OBIEE 11g using Windows Services


After installing OBIEE 11g in a windows environment,the server is stopped and started by using command windows.  This works fine in a Development or Testingenvironment, but in Production, this can cause serious issues. If server maintenanceis preformed or the server is restarted, OBIEE will not automatically come backup. The only way to start a windows program on start, without logging in, is byusing windows services. The following guide is set of steps we used to createand install OBIEE 11g using windows services. After the services are installed,they must be configured to start automatically after each other with delayedstartup to ensure that when one service completes, the next will start afterit. Please feel free to leave any questions or comments.


Set the following environment variables
System variable JAVA_HOME = D:\OBI11g\Oracle_BI1\jdk
System variable BI_ORACLE_HOME = D:\OBI11g\Oracle_BI1
installSvc.cmd
Take a backup of ‘installSvc.cmd’ located at ‘D:\OBI11g\wlserver_10.3\server\bin
Add the following to ‘installSvc.cmd’:
set JAVA_VM=-server
set MEM_ARGS=-Xms512m -Xmx512m -XX:MaxPermSize=512m-XX:+UseSpinning

AdministrationServer
  1. Create a command script called installAdmServer_Service.cmd.

    Open a text file and input the following lines [edit for your install]:
SETLOCAL
setDOMAIN_NAME=bifoundation_domain
setUSERDOMAIN_HOME=D:\OBI11g\user_projects\domains\bifoundation_domain
setSERVER_NAME=AdminServer
setPRODUCTION_MODE=true
set OPMN_PORT=9500
cd %USERDOMAIN_HOME%
call"D:\OBI11g\user_projects\domains\bifoundation_domain\bin\setDomainEnv.cmd"
call"D:\OBI11g\wlserver_10.3\server\bin\installSvc.cmd"
ENDLOCAL


2.     Add -delay:120000  in the installSvc.cmd file to the line at thebottom.
ForExample:
rem*** Install the service
"%WL_HOME%\server\bin\beasvc"-install -svcname:"beasvc %DOMAIN_NAME%_%SERVER_NAME%"  -delay:120000 -javahome:"%JAVA_HOME%"-execdir:"%USERDOMAIN_HOME%"-maxconnectretries:"%MAX_CONNECT_RETRIES%" -host:"%HOST%"-port:"%PORT%" -extrapath:"%EXTRAPATH%" -password:"%WLS_PW%"-cmdline:%CMDLINE%-log:"D:\OBI11g\user_projects\domains\bifoundation_domain\servers\AdminServer\AdminServer-stdout.txt"
  1. For troubleshooting / debugging purposes it is helpful to redirect standard out and error to a text file. Although most information is captured in the AdminServer server log files, you will not see all standard out and error when the server is started via a MS Windows Service (unlike when you start an AdminServer in console mode from the command prompt using startWebLogic.cmd). To redirect standard out to a text file, backup and edit installSvc.cmd file and change the line at the bottom of the file so it includes the -log parameter. For example:
"%WL_HOME%\server\bin\beasvc"-install -svcname:"beasvc %DOMAIN_NAME%_%SERVER_NAME%"  -delay:120000-javahome:"%JAVA_HOME%" -execdir:"%USERDOMAIN_HOME%"-maxconnectretries:"%MAX_CONNECT_RETRIES%" -host:"%HOST%"-port:"%PORT%" -extrapath:"%EXTRAPATH%"-password:"%WLS_PW%" -cmdline:%CMDLINE% -log:"D:\OBI11g\user_projects\domains\bifoundation_domain\servers\AdminServer\AdminServer-stdout.txt"
  1. Next,  run "installAdmServer_Service.cmd" and the service should be installed, it will have a name like "beasvc %DOMAIN_NAME%_%SERVER_NAME%" (e.g. beasvc bifoundation_domain_AdminServer)
The Service "Startup Type" will be 'Automatic'. Just like any otherMS Windows Service you can change the 'Startup Type' to 'Manual'.

For Managed Server bi_server1
  1. Create a command script called installBIServer_Service.cmd which has lines like:
SETLOCAL
setDOMAIN_NAME=bifoundation_domain
setUSERDOMAIN_HOME=D:\OBI11g\user_projects\domains\bifoundation_domain
setSERVER_NAME=bi_server1
setJAVA_HOME=D:\OBI11g\Oracle_BI1\jdk
setPRODUCTION_MODE=true
setADMIN_URL=http://localhost:7001
set OPMN_PORT=9500
setBI_ORACLE_HOME=D:\OBI11g\Oracle_BI1
cd %USERDOMAIN_HOME%
call"D:\OBI11g\user_projects\domains\bifoundation_domain\bin\setDomainEnv.cmd"
call"D:\OBI11g\wlserver_10.3\server\bin\installSvc.cmd"
ENDLOCAL
Notes:
    • Before running, add
-depend:"beasvcbifoundation_domain_AdminServer" -delay:180000
To thelast line at the bottom of the installSvc.cmd. For Example:
rem ***Install the service
"%WL_HOME%\server\bin\beasvc"-install -svcname:"beasvc %DOMAIN_NAME%_%SERVER_NAME%" -depend:"beasvcbifoundation_domain_AdminServer" -delay:180000-javahome:"%JAVA_HOME%" -execdir:"%USERDOMAIN_HOME%"-maxconnectretries:"%MAX_CONNECT_RETRIES%" -host:"%HOST%"-port:"%PORT%" -extrapath:"%EXTRAPATH%"-password:"%WLS_PW%" -cmdline:%CMDLINE% -log:"D:\OBI11g\user_projects\domains\bifoundation_domain\servers\AdminServer\bi_Server1-stdout.txt"
    • Before running, change the -log parameter in the installSvc.cmd file to the new location. For example:

      "%WL_HOME%\server\bin\beasvc" -install -svcname:"beasvc %DOMAIN_NAME%_%SERVER_NAME%" -depend:"beasvc bifoundation_domain_AdminServer" -delay:180000 -javahome:"%JAVA_HOME%" -execdir:"%USERDOMAIN_HOME%" -maxconnectretries:"%MAX_CONNECT_RETRIES%" -host:"%HOST%" -port:"%PORT%" -extrapath:"%EXTRAPATH%" -password:"%WLS_PW%" -cmdline:%CMDLINE% -log:"D:\OBI11g\user_projects\domains\bifoundation_domain\servers\AdminServer\bi_Server1-stdout.txt"
    • The ADMIN_URL value should reference the AdminServer hostname and listen port
    • The SERVER_NAME value is case sensitive. For example, if you are creating a MS Windows service for a different managed server such as 'wls_ods1' then the value needs to match the case of the server name otherwise the startup of the server via the MS Windows service will fail.
    • Be careful that there are no trailing spaces after each line in the command file - trailing spaces will cause the managed server to fail at startup. For example a trailing space in the ADMIN_URL value will result in the error

      <19-Jan-2010 11:37:58 o'clock GMT> <Error> <EmbeddedLDAP> <BEA-171524> <Cannot determine the Listen address for the Admin server
  1. Now run "installBIServer_Service.cmd". The Service should be installed, it will have a name like "beasvc %DOMAIN_NAME%_%SERVER_NAME%" (e.g. - beasvc bifoundation_domain_bi_server1)

    The Service "Startup Type" will be 'Automatic'. Just like any other MS Windows Service you can change the 'Startup Type' to 'Manual'.

OBIEE Services Dependencies
The servicesshould be started in the order below:
1)     OracleWebLogic NodeManager (D_OBI11g_wlserver_10.3)
2)     beasvcbifoundation_domain_AdminServer
3)   beasvcbifoundation_domain_bi_server1
4)   OracleProcessManager_instance1
SettingDependencies:
In RegistryEditor navigate to HKEY_LOCALMACHINE->SYSTEM->CurrentControlSet->service
For OracleProcessManager_instance1 Serviceset
‘DependOnService’= beasvc bifoundation_domain_bi_server1
For beasvc bifoundation_domain_bi_server1 Serviceset
‘DependOnService’= beasvc bifoundation_domain_AdminServer
Note: This should already be set as wecreated the dependency while creating the service
For beasvc bifoundation_domain_AdminServer Serviceset
‘DependOnService’= Oracle WebLogic NodeManager (D_OBI11g_wlserver_10.3)
Note: The startup type for all the aboveservices should be ‘Manual’
Starting OBIEE Services after the Database is Up andRunning
The Admin ServerService(beasvc bifoundation_domain_AdminServer) and Managed Server Service(beasvcbifoundation_domain_bi_server1) requires the database to be up and running forthem to start properly.
In order forOBIEE services to start after the database is up and running, we create a batchfile and set this as Startup Scripts to delay start OBIEE services after systemstartup.
Batch File:
NET STOP"OracleProcessManager_instance1"
TIMEOUT /T 300/NOBREAK
NET START"OracleProcessManager_instance1"
Setting batchfile as Startup Script:
Run-> gpedit.msc


In Local GroupPolicy Editor:
ComputerConfiguration->Windows Settings->Scripts (Startup/Shutdown)->Startup
 Add the Batchfile as startup script.


Friday, January 20, 2012

Federal News Radio Segment with Guident

January 20, 2012

Dan Ackerman, Guident Executive Vice President, and I hadthe fortunate experience of being interviewed by Federal News Radio 1500 AM aswe were guests on “Federal TechTalk with John Gilroy”. The focus of thediscussion was the current state of government business intelligence – how thegovernment is using it for increasing efficiencies and enabling dataeffectiveness – as well as taking a look into what’s on the horizon including topics such as mobile BI, predictive analytics, Big Data, content intelligence, cost containment, and consumer intelligence.

The interview experience was great.  John Gilroy is an energetic, personable guywho made Dan and I instantly feel comfortable. Even though we were in a recording studio with large microphones infront of us, John helped us feel like we were having a casual conversation overcoffee.  The interview was ‘Live-to-Tape’which means while the show was not live, it won’t be edited.  The pressure was on for Dan and I to giveclean, concise answers with minimal hiccups. Luckily, this was Dan’s third timeon the show so he and John Gilroy were able to help me with my rookie radiobutterflies.

The recording consisted of 4 ten minute blocks ofinterviews.  Between each session, John,Dan, and I chatted for a few minutes to discuss topics for the next block.  While 40 minutes seems like a long time, thesession really flew by and allowed me to become one of John’s more than 240survivors who have interviewed with him. This was truly a great experience and exciting for Dan and I torepresent Guident in discussing our thoughts on the state of current and futuregovernment affairs.

1/24/12 Update - Click here for a direct link to the Federal News Radio Segment featuring Guident.

Please provide us your comments and opinions on the businessintelligence trends in the federal government!

Ken Raffel
Senior Vice President

Thursday, August 25, 2011

OBIEE Publisher 11g - Performance Monitoring and User Auditing

BI Publisher performance monitoring enables you to monitor the performance of queries, reports and document generation and to analyze the provided details. User auditing provides information about what users logged in, when, how many times, what reports they accessed, and other actions they took within the application.


Enabling Monitoring and Viewing the Audit Log


To enable monitoring:
1. Update properties in the BI Publisher server configuration file.
2. Copy the component_events.xml file to your Middleware Home.
3. Configure the Audit Policy Settings with Fusion Middleware Control (Enterprise Manager)
4. Restart WebLogic Server.

To View Audit Log:
5. Configure Audit Repository
6. Create Data Source in WebLogic Server
7. Register the Audit-Storing Database to your Domain
8. Create Auditing Reports

1. Update Properties in the BI Publisher Server Configuration File

Three properties from the configuration file ‘xmlp-server-config.xml’ needs to be updated, the default location of the file is “config/bipublisher/repository/Admin/Configuration/xmlp-server-config.xml”.
Set: MONITORING_ENABLED = “true” and AUDIT_ENABLED = “true”, add a new property AUDIT_JPS_INTEGRATION = “true”. Below is a sample xmlp-server-config.xml file.
Before update
After Update
<'xmlpConfig xmlns="http://xmlns.oracle.com/oxp/xmlp">
   <'property name="SAW_SERVER" value=""/>
   <'property name="SAW_SESSION_TIMEOUT" value="90"/>
   <'property name="DEBUG_LEVEL" value="exception"/>
   <'property name="SAW_PORT" value=""/>
   <'property name="SAW_PASSWORD" value=""/>
   <'property name="SAW_PROTOCOL" value="http"/>
   <'property name="SAW_VERSION" value="v4"/>
   <'property name="SAW_USERNAME" value=""/>
   <'property name="MONITORING_ENABLED" value="false"/>
   <'property name="AUDIT_ENABLED" value="false"/>  
<'/xmlpConfig>
<'xmlpConfig xmlns="http://xmlns.oracle.com/oxp/xmlp">
   <'property name="SAW_SERVER" value=""/>
   <'property name="SAW_SESSION_TIMEOUT" value="90"/>
   <'property name="DEBUG_LEVEL" value="exception"/>
   <'property name="SAW_PORT" value=""/>
   <'property name="SAW_PASSWORD" value=""/>
   <'property name="SAW_PROTOCOL" value="http"/>
   <'property name="SAW_VERSION" value="v4"/>
   <'property name="SAW_USERNAME" value=""/>
   <'property name="MONITORING_ENABLED" value="true"/>
   <'property name="AUDIT_ENABLED" value="true"/>
   <'property name=”AUDIT_JPS_INTEGRATION” value=”true"/>
<'/xmlpConfig>
note: remove ' from tags above
2. Copy the component_events.xml file to your Middleware Home
a. Create a new directory “xmlpserver” at MIDDLEWARE_HOME/oracle_common/modules/oracle.iau_11.1.1/components
b. Copy the existing file “component_events.xml” from MIDDLEWARE_HOME/user_projects/domains/bifoundation_domain/config/bipublisher/repository/Admin/Audit to MIDDLEWARE_HOME/oracle_common/modules/oracle.iau_11.1.1/components/xmlpserver location.
3. Configure the Audit Policy Settings with Fusion Middleware Control
a. Login in to Oracle Fusion Middleware Control.
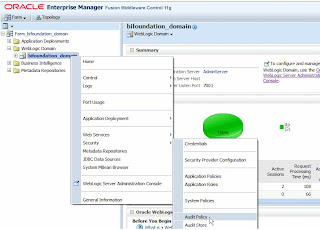
b. User WebLogic Domain, right-click bifoundation_domain and chose Security and click Audit Policy
c. To set the Audit Level for BI Publisher, choose Medium from the Audit Level drop down menu or choose Custom to enable individual components. For this exercise we choose Medium.
4. Restart WebLogic Server
Restart the WebLogic Server using Fusion Middleware Control.
After restart the Audit information will be available in /AdminServer/logs/auditlogs/xmlpserver/audit.log. Create few reports and notice the audit logs in the file. Now we can create and configure audit repository to store the logs in database table instead in log files. Reports can be built over these tables to monitor.
5. Configure Audit Repository.
a. Create the audit schema using RCU (Repository Creation Utility – a separate package required for along with the OBIEE 11.x package)
                                  i. Run rcu.bat from RCU_HOME/bin
                                 ii. Follow the installation wizard and select Audit Services as show below.
                              iii. Continue the wizard and click Finish.
                             iv. As show below three schemas will be created for audit by the installation.
1. OBI_IAU
2. OBI_IAU_APPEND
3. OBI_IAU_VIEWER
6. Create a Data Source in WebLogic Server
To access the database schemas that we have created above we need to create a JDBC connection on the WebLogic Server. So that Audit Framework can access the schemas. Following are the steps to create a JDBC connection using Oracle WebLogic Server
a. Login to WebLogic Server Administration Console
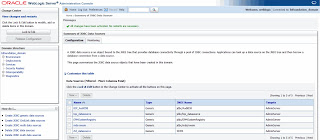
b. Under Services, click Data Sources.
c. Click Lock and Edit button to enable editing.
d. On the Summary of JDBC Data Sources page, click New and click Generic Data Source.
e. Enter the following details for the new data source;
                           i. Name (example: BIP_AuditDB)
                          ii. JNDI Name (example: jdbc/AuditDB)
                         iii. Database Type (example: Oracle)
f. Click Next and select the database driver “Oracle's Driver (Thin XA) Versions: 9.0.1 or later” for Oracle database.
g. Enter the required connection properties like Database name, host name, port, database user name (for our exercise it’s OBI_IAU) and the password.
h. Click Next and accept the default setting and then click Test Configuration button as show below.
i. If the connection was successful, click Activate Changes to make the changes available.
7. Register the Audit-Storing Database to your Domain
a. Login to Fusion Middleware Control
b. Navigate to the WebLogic Domain, right click bifoundation_domain, then select Security, then Audit Store
c. Click Search Data Sources. From the Select Data Source dialog, select the data source you created and click OK
d. Click Apply and restart the WebLogic Server.
Note: After the restart, BI Publisher will store all auditing data into the database table called "IAU_BASE". To verify this procedure, try logging in to BI Publisher and opening a few reports. You should see the activity audited in the "IAU_BASE" table. If not, check the log file, which is located at: $BI_HOME/user_projects/domains/bifoundation_domain/servers/AdminServer/logs/AdminServer-diagnostic.log.
With the above data in IAU_BASE you can design the auditing reports using BI Publisher.
8. Create Auditing Reports
Following are the few steps in brief assuming the user knows about creating reports in BI Publisher in detail. 
  a. Create data source in BI Publisher
      Register the audit data source (JNDI/JDBC connection) that you created in the previous procedure as a JNDI data source in BI Publisher. Because you created a JDBC connection registered as JNDI, you do not need to create a new JDBC connection by typing the connection URL, username/password, and so on. You can just register it using the JNDI name (for example: jdbc/AuditDB).
           i. Log in to BI Publisher with administrator privileges and click the Administration link.
          ii. Under Data Sources, click JNDI Connection, and then click Add Data Source.
         iii. Enter the Data Source Name and JNDI Name. The JNDI Name is the name you provided       in the WebLogic Console as the auditing data source (for example: jdbc/AuditDB).
        iv. Click Test Connection to ensure that the data source connection works.
          v. Add the appropriate roles to the data source so that the report developers and consumers         can view the reports built on this data source. Click Apply to save.
b. Create (advanced) auditing reports for OBIEE version 11.1.1.5
With the version 11.1.1.5, we can make use of xmlpserver_audit.sql script to create a new table XMLPSERVER. Following are the steps;
                                                  i. Locate the table creation script xmlpserver_audit.sql at /user_projects/domains/bifoundation_domain/config/bipublisher/repository/Admin/Audit
                                                 ii. Edit the PERMISSIONS and SYNONYMS sections of the script as shown below.
From:
To:
                                               iii. Execute the updated script to create a new table and in OBI_IAU schema that you have created. You can login as SYS and alter the session to execute on OBI_IAU schema.
                                             iv. Restart the WebLogic Server.
                                              v. Create few sample reports in BI Publisher and notice the auditing information in the new table XMLPSERVER which will be used for building advanced BI Publisher auditing reports.
c. Create a data model
                                              i. Create a new data model with JNDI as the default data soruce.
                                            ii. Build or apply the following query using IAU_BASE table from OBI_IAU schema.
select
IAU_BASE.IAU_COMPONENTTYPE as IAU_COMPONENTTYPE,
IAU_BASE.IAU_EVENTTYPE as IAU_EVENTTYPE,
IAU_BASE.IAU_EVENTCATEGORY as IAU_EVENTCATEGORY,
IAU_BASE.IAU_TSTZORIGINATING as IAU_TSTZORIGINATING,
to_char(IAU_TSTZORIGINATING, 'YYYY-MM-DD') IAU_DATE,
to_char(IAU_TSTZORIGINATING, 'DAY') as IAU_DAY,
to_char(IAU_TSTZORIGINATING, 'HH24') as IAU_HH24,
to_char(IAU_TSTZORIGINATING, 'WW') as IAU_WEEK_OF_YEAR,
IAU_BASE.IAU_INITIATOR as IAU_INITIATOR,
IAU_BASE.IAU_RESOURCE as IAU_RESOURCE,
IAU_BASE.IAU_TARGET as IAU_TARGET,
IAU_BASE.IAU_MESSAGETEXT as IAU_MESSAGETEXT,
IAU_BASE.IAU_FAILURECODE as IAU_FAILURECODE,
IAU_BASE.IAU_REMOTEIP as IAU_REMOTEIP
from
OBI_IAU.IAU_BASE IAU_BASE
where
IAU_BASE.IAU_COMPONENTTYPE = 'xmlpserver'
To create a data model that contains only the BI Publisher data, then you can filter the data based on the value of the IAU_COMPONENTTYPE column that contains the product name. For BI Publisher, the value is "xmlpserver"
                                          iii. Test the sample with Get XML Output and save XML to your data model.
                                        iv. Save the data model.
d. Create the reports
Use know techniques for creating BI Publisher layouts, this exercise is out of scope.
                                           i. Using the layout options create a new BI Publisher layout.
                                          ii. Select the data model you have created in the previous procedure.
                                        iii. Click Add New Layout and click Base Templates. Following is the sample report from the layout editor (from Oracle)
                                    iv. Below are few samples auditing report with the data from the newly created schemas. Use both IAU_BASE and XMLPSERVER tables to build advanced detailed reports.